
How To Create A Table In MS Word: Hi friends! If you’re here, it means you want to learn How To Create A Table In MS Word. This guide will show you a simple and easy ways to do it.
Tables are helpful for organizing and formatting documents. They let you align text, numbers, and graphics easily, and text can wrap within cells. You can use tables to create forms, like lists of phone numbers or employee rosters. Additionally, tables simplify making publications like calendars, brochures, and business cards.
So, Let’s start reading this article without wasting any time!
How To Create A Table In MS Word
To make a table, first decide how many columns (up and down) and rows (left to right) you need. Columns and rows cross to form small boxes called cells. The number of columns and rows you choose will decide how many cells your table has.
Steps To Insert A Table
Step 1: Go to the Insert tab.
Step 2: Click the Table button.
Step 3: Use the grid to pick how many columns and rows you want.
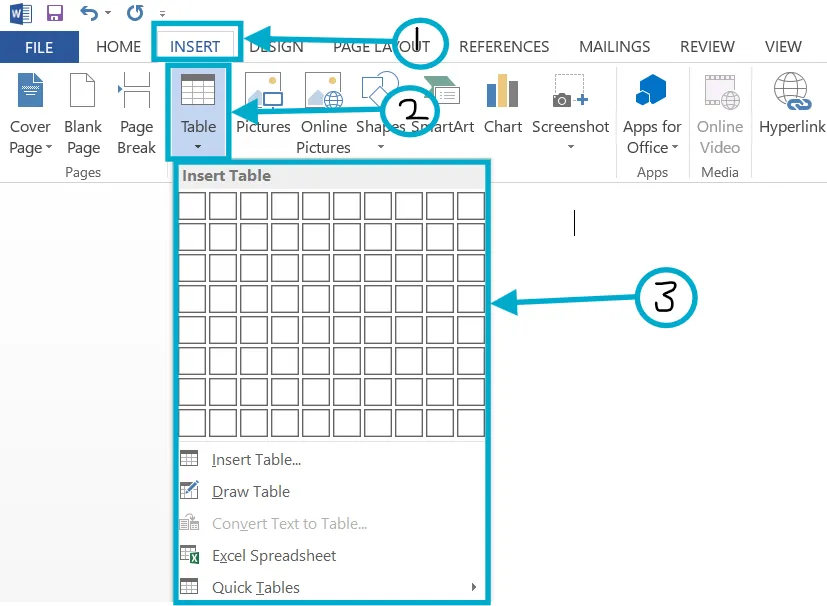
Step 4: Your table will appear with the chosen number of rows and columns.
Adding Content
- Type your content into the cells.
- Use the arrow keys to move between cells or press Tab to jump to the next cell.
Selecting Cells
- Single Cell: Click inside the cell or use the arrow cursor to select it.
- Multiple Cells: Click and drag to highlight the cells you want.
- Row: Click just outside the table, next to the row you want to select.
- Column: Click above the column when the cursor turns into an arrow.
- Entire Table: Click the table selector button in the top-left corner of the table.
Adding Rows or Columns
Step 1: Click inside a cell near where you want to add a row or column.
Step 2: Go to the Layout tab and click the Insert button.
Step 3: Choose to add a row above or below, or a column to the left or right.
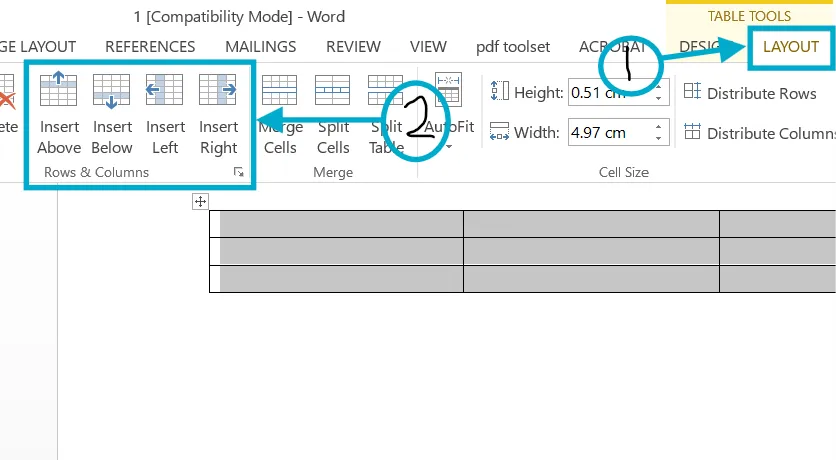
Step 4: You can also hover between rows or columns and click the + button to add one quickly.
Also Read: How To Add Header And Footer In Excel
Deleting Rows or Columns
Step 1: Click inside a cell in the row or column you want to delete.
Step 2: Go to the Layout tab and click the Delete button.
Step 3: Choose to delete the cell, row, column, or the entire table.
Step 4: If you delete a single cell, you can decide how to shift the remaining cells to fill the space.
This is a simple guide to creating and editing tables!
Also Read: How To Add Gridlines In Excel
Conclusion
In conclusion, making a table in MS Word is an easy and useful tool for organizing data. You can add a table using the “Insert Table” option, draw your own, or turn text into a table. Word lets you change borders, colors, and alignment to make your table look neat and clear.
Learning how to use tables well can make your documents look more professional and help you work faster.
Thank you for reading this article till the end!